The clearest, most beautiful water isn’t always the safest for your family; true safety comes from understanding the ocean’s hidden dynamics.
- Seasonal factors like sargassum blooms can dramatically reduce visibility and safety, even in famously clear locations.
- Not all safety gear is equal; a traditional snorkel is often a safer choice than a full-face mask, especially for beginners in currents.
Recommendation: Instead of just searching for a perfect beach, learn to assess the environment, from water temperature to charter boat safety, to build real water confidence.
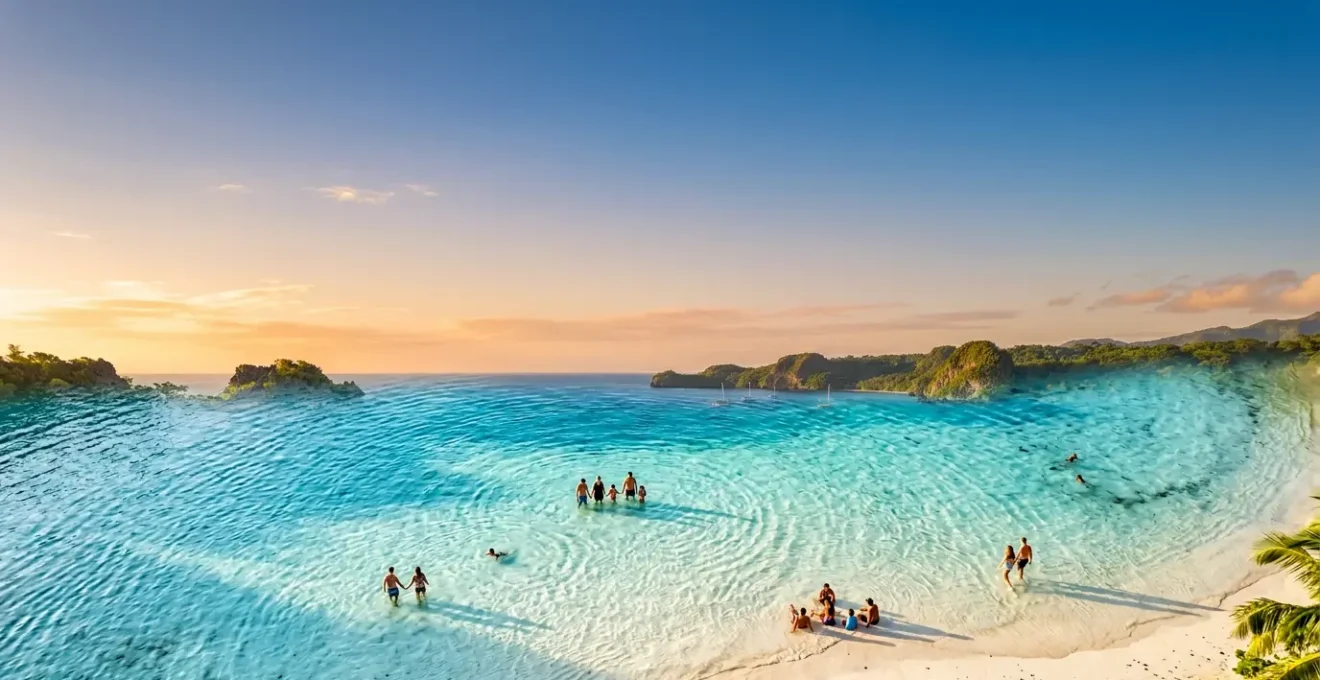
As a parent or someone new to the ocean, the quest for that perfect swimming spot feels universal. You picture it: water so clear you can count the grains of sand, gentle waves lapping the shore, and a worry-free afternoon for you and your children. The internet is filled with lists of idyllic beaches that promise exactly this. But as a water safety instructor, I can tell you that the most common mistake is equating visual clarity with genuine safety. The bluest water can hide invisible risks.
The standard advice—”check the weather,” “look for lifeguards”—is a starting point, but it’s incomplete. It doesn’t prepare you for the nuances of the marine environment. What do you do when the water clarity suddenly drops? How do you know if that tingling sensation is harmless or something to worry about? This guide is built on a different principle: that true safety doesn’t come from a list of “approved” beaches, but from developing your own water literacy. It’s about learning to read the environment, understand the gear, and anticipate challenges before they arise.
This approach transforms you from a passive visitor into a confident and informed participant. Instead of just looking *at* the beautiful water, you’ll learn to look *into* it. We’ll explore the hidden dynamics that govern water safety, moving from the large-scale environmental factors that affect clarity to the small but crucial details of choosing the right snorkel or identifying a safe boat charter. This knowledge is what builds lasting confidence, turning anxiety into empowerment and ensuring your family’s memories are of joy, not incidents.
To help you navigate these critical aspects of water safety and enjoyment, this guide is structured to answer the most pressing questions a beginner or parent might have. From understanding the environment to capturing the perfect memory, each section builds your confidence step-by-step.
Contents: Finding Your Confidence in Clear Waters
- Why Water Clarity Drops Drastically During Certain Months?
- Full Face Mask vs Traditional Snorkel: Which Is Safer for Caribbean Currents?
- The “Sea Lice” Myth: What Is Actually Stinging You in the Water?
- How to Charter a Private Boat to Blue Lagoons Without Getting Scammed?
- Caribbean Side vs Atlantic Side: Which Water Is Warmer in Winter?
- How to Book an Ethical Whale Watching Tour That Respects the Animals?
- How to Build a High-Adrenaline Itinerary for 7 Days in DR?
- How to Photograph the White Sands Without Overexposing Your Shots?
Why Water Clarity Drops Drastically During Certain Months?
You arrive at a beach famed for its crystalline waters, only to find a murky, brown shoreline. This disappointing scenario is often caused by a massive, natural phenomenon: sargassum. This type of seaweed forms vast floating mats in the Atlantic, and in recent years, these blooms have exploded in size. One of the largest, The Great Atlantic Sargassum Belt now spans an unprecedented 8,850 kilometers, and its arrival on coastlines is a primary driver of reduced water clarity. When large quantities wash ashore, it decomposes, releasing nutrients that can fuel algal blooms and turn clear water cloudy.
These events are seasonal, typically peaking from late spring through summer, but can be unpredictable. Understanding this cycle is the first step in developing water literacy. It’s not just about weather; it’s about oceanography. Fortunately, you don’t have to guess. Scientists now use satellite imagery and predictive models to track these blooms. Before your trip, you can become your own forecaster by consulting these tools:
- NOAA’s Sargassum Inundation Risk (SIR): This provides 7-day forecasts for specific Caribbean regions.
- University of South Florida’s Satellite Tracking: Offers near real-time views of sargassum movement across the Atlantic.
- Local Reporting Groups: Many destinations have dedicated Facebook groups where locals and tourists post daily photos of beach conditions, providing invaluable, on-the-ground intelligence.
By checking these resources, you can adjust your plans, choosing a different side of the island or a different activity for the day, ensuring that a sargassum event doesn’t ruin your search for clear, safe water. This proactive approach is far more effective than relying on outdated “best beaches” lists.
Full Face Mask vs Traditional Snorkel: Which Is Safer for Caribbean Currents?
Once you’ve found clear water, the right gear is essential for safe exploration. The market is flooded with full-face snorkel masks, often advertised as “easy” and “perfect for beginners.” While they offer a wide field of vision, they pose a significant and often overlooked safety risk, especially for children and inexperienced swimmers. The primary danger is the potential for carbon dioxide (CO2) buildup. Unlike a traditional snorkel, where exhaled air is immediately expelled, a full-face mask can trap CO2. This can lead to headaches, dizziness, and in worst-case scenarios, loss of consciousness in the water.
This risk is magnified in the presence of even a gentle current. If you have to exert yourself even slightly, your breathing rate increases, accelerating CO2 production and the potential for a dangerous buildup. For this reason, as a safety instructor, I strongly recommend the classic, two-piece traditional snorkel and mask. It’s a time-tested design for a reason: it’s simple, reliable, and fundamentally safer. The open-top snorkel ensures that every breath you exhale is fully expelled, eliminating the risk of CO2 accumulation.
Learning to use a traditional snorkel is a rite of passage that builds true water confidence. It teaches proper breathing techniques and breath control—essential skills for any water activity. It may take a few minutes of practice in shallow water to get comfortable, but the safety and skills gained are invaluable. Always choose gear that enhances safety and skill, not just one that promises convenience.
The “Sea Lice” Myth: What Is Actually Stinging You in the Water?
There’s nothing more unsettling for a beginner or a child than feeling an invisible “sting” in the water. The term “sea lice” is often used to describe this sensation, but it’s a misnomer. Sea lice are parasites that affect fish, not humans. The real culprits are typically microscopic jellyfish larvae or fragments of larger marine organisms. While rarely dangerous, the irritation can cause anxiety and cut a swim short. Understanding what’s causing the sting is the key to both treating it effectively and reducing fear.
The most common sources of these pin-prick stings are the larvae of thimble jellyfish, which are virtually invisible to the naked eye. They tend to get trapped between your swimsuit and your skin, where pressure or friction causes them to fire their stinging cells (nematocysts). Other potential stingers include tiny, transparent thimble jellyfish themselves or fragments of tentacles from larger jellyfish or feathery hydroids that grow on rocks and seaweed. Knowing the difference is crucial for proper first aid, as the wrong treatment can sometimes make it worse.
This identification guide helps distinguish between the common culprits. Remember, a quick rinse with seawater (not freshwater, which can activate more stingers) and removing your swimsuit is often the best immediate action.
| Stinger Type | Appearance | Sting Pattern | Effective Treatment |
|---|---|---|---|
| Jellyfish Larvae | Microscopic, invisible | Pin-prick sensations, raised welts | Vinegar rinse, hot water immersion |
| Thimble Jellyfish | 1-2cm transparent bell | Burning patches, red marks | Seawater rinse, cold compress |
| Hydroids | Feathery colonies on rocks | Linear burning trails | Hot water (45°C), antihistamine |
| Sea Nettle fragments | Floating tentacle pieces | Long red streaks | Shaving cream removal, ice pack |
Demystifying these stings is a huge step in building water confidence. When a child understands it’s just “ocean plankton” and not some scary monster, their fear often subsides. This knowledge empowers you to manage minor discomforts and continue enjoying the ocean.
How to Charter a Private Boat to Blue Lagoons Without Getting Scammed?
For many families, chartering a private boat to a secluded, crystal-clear lagoon is the ultimate goal. It offers privacy and access to pristine spots away from the crowds. However, this is also where tourists are most vulnerable to scams or, worse, unsafe operators. The “good deal” you find on the beach might come from a captain with an improperly maintained boat, no insurance, or inadequate safety equipment. Vetting your charter is not about being cynical; it’s a non-negotiable step in ensuring your family’s safety on the water.
Your primary concern should be safety protocols and credentials, not just the price or the promise of rum punch. A professional, responsible captain will welcome your questions and be transparent about their safety measures. An operator who is evasive or dismissive of your concerns is a major red flag. Before you hand over any money, you must become a savvy consumer and a safety advocate for your family. A few pointed questions can reveal everything you need to know about the legitimacy of a charter operation.
Don’t be shy about running through a checklist with a potential captain. Your family’s safety is worth more than a few moments of potential awkwardness. This simple audit can be the difference between a dream day and a potential disaster.
Your Pre-Charter Captain Vetting Checklist
- Ask the Captain: “Do you have both a working VHF radio AND a satellite phone or an EPIRB for offshore emergencies?”
- Request to See Credentials: “May I please see your captain’s license and verify it is appropriate for the class of this boat?”
- Confirm Insurance: “Is your charter commercially insured for passengers, and may I see proof of the policy?”
- Inspect Safety Gear: “Can you show me the life jackets for all ages on board, the location of flares, and the first-aid kit?”
- Inquire About Emergencies: “What is your standard procedure if we have a medical emergency while at sea?”
A captain who can confidently and transparently answer these questions is one who takes their responsibility seriously. This is the only type of operator you should entrust with your family’s well-being.
Caribbean Side vs Atlantic Side: Which Water Is Warmer in Winter?
When planning a winter escape, water temperature is a top priority, especially for children who get cold easily. On many Caribbean islands, you have a choice between two very different bodies of water: the sheltered, western-facing Caribbean Sea and the exposed, eastern-facing Atlantic Ocean. As a general rule, the water on the leeward (Caribbean) side is consistently warmer. Protected from the prevailing trade winds, these waters are calmer and absorb more solar radiation. In winter, sheltered Caribbean leeward coasts typically measure 2-4°C warmer than their Atlantic counterparts on the same island.
This makes spots like western Jamaica or the south coast of the Dominican Republic particularly appealing for families seeking bathtub-warm water. However, the principle of water literacy reminds us that “warmer” isn’t always “better.” Extremely warm, stagnant water can sometimes present its own set of challenges, a nuance that most travel blogs miss. This is where a deeper understanding of marine biology becomes a crucial safety tool.
The Paradox of “Too-Warm” Water
A 2024 study on Caribbean bays revealed an interesting correlation. Waters that became excessively warm, exceeding 31°C (88°F), showed higher rates of growth for certain types of bacteria, like Vibrio. Paradoxically, slightly cooler waters in the 27-29°C (80-84°F) range, which still feel perfectly warm and comfortable, maintained a better biological balance and often had clearer visibility. For children, the elderly, or anyone with a compromised immune system, the “perfectly warm” water may actually be safer than the “hot tub” water.
The takeaway isn’t to fear warm water, but to appreciate the complexity of marine ecosystems. A gentle flow of water, even if it makes the temperature slightly cooler, is a sign of a healthier, more balanced, and ultimately safer swimming environment. Look for coves that have a slight tidal flush rather than completely stagnant lagoons.
How to Book an Ethical Whale Watching Tour That Respects the Animals?
Part of appreciating the marine world is engaging with its most magnificent inhabitants responsibly. A whale watching tour can be a life-changing experience for a family, but only if it’s done ethically. An unethical tour not only stresses the animals but also teaches children a poor lesson about our relationship with nature. Choosing the right operator is an act of conservation and a critical part of a responsible travel ethos. The best tours prioritize the animals’ well-being over the tourists’ perfect photo-op.
Ethical operators see themselves as ambassadors for the ocean. Their tours are educational, led by naturalists who provide context about the whales’ behavior, biology, and the threats they face. They adhere to strict guidelines about vessel speed and approach distance, understanding that their presence has an impact. An operator that guarantees sightings, offers “swim-with” encounters (which are highly regulated and often illegal), or aggressively chases the animals is putting profit before protection. As a discerning traveler, you have the power to support the good operators and starve the bad ones.
Look for these red flags when booking a tour:
- Boats actively chasing or circling whales to force a reaction.
- Getting closer than the regulatory minimum, which is 100 meters (about 300 feet) in most regions.
- Using multiple boats to “box in” a pod of whales.
- Loud engine noises or sudden speed changes near the animals.
- A lack of any educational component or naturalist guide on board.
Conversely, operators who participate in local research, such as photo-identification programs, are often the most committed to conservation. A truly ethical operator knows that a respectful distance and a quiet approach often yield the most profound and natural encounters.
The quietest boats are often the most ethical. Operators using passive acoustics to listen for whales rather than sight alone demonstrate genuine respect for marine life.
– Marine Biologist Research Team, NOAA Marine Sanctuary Guidelines
Key Takeaways
- True water safety is not about finding a “perfect” beach, but about developing “water literacy” to assess any environment.
- Look beyond visual clarity; factors like sargassum, water temperature, and microscopic marine life all impact safety and comfort.
- Your gear is your lifeline: prioritize the proven safety of a traditional snorkel over the convenience of a full-face mask, especially for beginners.
- Vet all third-party operators, from boat charters to wildlife tours, by asking pointed questions about safety credentials and ethical practices.
How to Build a High-Confidence Itinerary for 7 Days in the Dominican Republic?
For a family with mixed swimming abilities or for a beginner adult, the idea of a “high-adrenaline” vacation can be daunting. The goal shouldn’t be adrenaline, but confidence. A well-structured itinerary can act as a “Confidence Ladder,” progressively and gently introducing you to new water experiences. The Dominican Republic, with its diverse coastline of calm lagoons and protected reefs, is an ideal location for this approach. Instead of throwing yourself in the deep end, you can build skills and comfort day by day.
The principle is simple: start in the calmest, shallowest environment possible to build foundational comfort. Each subsequent day introduces a small, manageable new element—a bit more depth, a gentle current, a new piece of gear. This gradual exposure prevents overwhelm and replaces fear with a sense of accomplishment. A rest day is also crucial to let the learning sink in and avoid fatigue. The successful experience of one day becomes the foundation for tackling the next, as demonstrated by a family who applied this very method at Samaná Peninsula, where previously fearful children voluntarily joined a snorkeling trip by the end of the week.
Here is a sample 7-day Confidence Ladder itinerary designed for beginners in the DR:
- Day 1: Comfort and Buoyancy. Start at a calm, shallow lagoon like Playa Dorada. The only goal is to get comfortable floating and putting your face in the water. No pressure.
- Day 2: First Look Below. Practice with your traditional snorkel and mask in the crystal-clear, waist-deep natural pools at Playa Frontón.
- Day 3: Exploring a Protected Reef. Graduate to the sheltered reef at Sosúa Bay. The water is calm with about 3 meters of visibility, perfect for seeing your first coral and fish.
- Day 4: Rest and Alternative Activity. Take a break from swimming. Try some optional beach kayaking in the calm morning waters at Cabarete.
- Day 5: Introduction to Currents. Experience a gentle drift snorkel at Playa Ensenada, where a mild current does the work for you. Always go with a guide.
- Day 6: Deeper Water with a Guide. Join a guided tour to see sea turtles at a deeper reef off Bayahibe. The presence of an expert provides a huge safety net.
- Day 7: Celebration Day. You’ve done it! Return to your favorite spot from the week or try a new, calm activity like stand-up paddleboarding to celebrate your newfound confidence.
How to Photograph the White Sands Without Overexposing Your Shots?
After carefully choosing your location, vetting your gear, and building your confidence, you’ve finally found it: your perfect, safe, crystal-clear paradise. Now you want to capture that memory. But photographing bright white sand and sparkling turquoise water is notoriously tricky. The intense reflection of light fools most automatic camera settings, resulting in photos where the sand is a “blown-out” white blob with no detail, or the water looks dark and uninviting. Learning a few manual settings, even on your smartphone, can make all the difference.
The key is to tell your camera to intentionally underexpose the image slightly. Your camera’s meter sees all that brightness and tries to make it a neutral gray, which is why the scene gets overexposed. By manually lowering the Exposure Value (EV), you preserve the delicate textures in the bright sand and the rich blue and green tones in the water. Most smartphones allow you to do this by tapping on the screen to focus, then sliding your finger down to decrease the brightness before taking the shot.
For those who want more control, here are a few smartphone settings to master for perfect beach photos:
- Set Exposure Value (EV): Lower it to -0.7 or -1.0. This is the single most effective trick to prevent blown-out highlights on the white sand.
- Check the Histogram: If your camera app has this feature, enable it. Make sure the graph’s data doesn’t “clip” or bunch up against the far right edge.
- Use Your Focus Point Wisely: Don’t tap to focus on the brightest white sand. Instead, focus on a mid-tone area, like wet sand or a person’s skin, to get a more balanced reading.
- Shoot During the Golden Hour: The hour after sunrise and before sunset provides soft, warm light that is much easier to photograph and far more flattering.
- Use Gridlines for Composition: Enable your phone’s gridlines and place the horizon on the top or bottom third line, never in the center, for a more dynamic and professional-looking composition.
By mastering these simple techniques, your photos will finally match the beauty of the memories you’re making, capturing the texture of the sand and the true color of that perfect, clear water.
By embracing the principle of water literacy, you are now equipped not just to find clear water, but to ensure it’s a truly safe and enriching environment for you and your family. Use this knowledge on your next adventure to explore the aquatic world with confidence and respect.
Frequently Asked Questions About Caribbean Water Safety
Should I use urine on jellyfish stings?
No, this is a pervasive myth. Depending on the species, urine can actually trigger more venom release from the stinging cells. The best practice is to rinse the area with seawater or, for certain species, vinegar.
Do ‘stinger-blocking’ lotions really work?
Yes, some products have shown proven effectiveness. Lotions like Safe Sea work by creating a slick barrier on the skin that mimics the mucus of a clownfish, making it difficult for jellyfish tentacles and larvae to attach and fire their stingers.
Can a simple freshwater rinse prevent larvae activation?
Yes, but the timing is critical. A freshwater rinse immediately after exiting the ocean can wash off any microscopic larvae before they have a chance to get trapped and activated. However, rinsing with freshwater once the larvae have dried on your skin can cause them to sting, so it must be done right away.