Hiking the Baní Dunes is a tactical operation, not a casual stroll. Success depends on managing environmental threats, not just avoiding midday heat.
- Thermal management is critical: sand can cause severe burns, requiring specific footwear protocols.
- Tactical timing is everything: use the golden hours for activity and the high-sun period for strategic repositioning, like visiting the nearby salt flats.
Recommendation: Treat this guide as your mission briefing. Follow the timing and equipment protocols without deviation for a successful and safe expedition.
Listen up. You’re planning a trip to the Dunas de Baní, thinking it’s just another pretty Caribbean landscape. That’s your first mistake. This isn’t a beach; it’s a desert environment dropped into the tropics, and it demands respect. Most day-trippers show up with flip-flops and a single bottle of water, armed with the common advice to “go early.” This is dangerously inadequate. They focus on the sun above, completely ignoring the primary threat under their feet and the microscopic projectiles in the air.
The truth is, surviving this environment isn’t about simply avoiding the midday sun. It’s a matter of tactical awareness and precise execution. This is a mission, and your objective is to experience this unique landscape without succumbing to heat exhaustion, equipment failure, or injury. We’re going to move beyond the platitudes and into operational procedure. We will dissect the environmental threats, establish equipment protocols, and define a mission timeline that turns a potentially hazardous trip into a successful expedition.
This briefing will provide the intelligence you need. We’ll cover terrain analysis, thermal threat management, tactical timing, combined operations with adjacent areas, and equipment protection. Forget what you think you know about a day trip. It’s time to think like a survivalist.
This guide serves as your operational manual. It is structured to build your mission plan from the ground up, covering every critical variable for a successful expedition into the Baní Dunes. Review each section carefully before deployment.
Summary: A Tactical Guide to the Baní Dunes Expedition
- Why Is There a Desert Only One Hour from the Rainforest?
- Shoes or Barefoot: What Is the Best Way to Walk on Hot Sand?
- When Is the Best Time of Day to Slide Down the Dunes?
- How to Combine the Dunes and Salinas for a Perfect Day Trip?
- The Wind Mistake That Can Ruin Your Eyes and Camera
- How to Reach the “Secret” Beaches of the North Coast Without a Guide?
- Where to Find Artisan Workshops Instead of Tourist Souvenir Shops?
- How to Photograph the White Sands Without Overexposing Your Shots?
Why Is There a Desert Only One Hour from the Rainforest?
First rule of any operation: know your terrain. The existence of the Baní Dunes is a geological anomaly that you must understand to appreciate the risks. Located on the southern coast, this protected area is the largest desert in the Caribbean. The dunes are not a random collection of sand; they are the result of a unique confluence of factors. The Bahoruco and Central mountain ranges to the north create a rain shadow effect, while the prevailing winds and currents from the Caribbean Sea continuously deposit sediment from the nearby Baní and Ocoa rivers.
This isn’t a small sandlot. The operational area is significant; the dune field stretches an impressive 15 kilometers along the coast, creating a vast landscape of shifting sands. This ecosystem is home to hardy flora and fauna, including cacti and iguanas, all adapted to the arid conditions. Your gear and your body are not. The environment’s very existence is proof of extreme conditions—low precipitation, intense solar radiation, and constant wind.
Understanding this paradox is critical. You are entering a true desert microclimate, not a typical tropical beach. The strategies and equipment that work for a day in Punta Cana will fail you here. Acknowledging that you are an outsider in a harsh, specialized environment is the first step toward a successful mission. Disrespecting this fact is the fastest route to heat exhaustion or worse.
Shoes or Barefoot: What Is the Best Way to Walk on Hot Sand?
The primary thermal threat in the dunes is not the air temperature; it’s conductive heat transferring from the sand to your feet. The fantasy of running barefoot across the dunes is a dangerous one. Sand is an excellent conductor of heat, and under the Caribbean sun, its surface temperature can become extreme. In fact, scientific studies confirm that sand conducts heat exceedingly well and can cause second-degree burns in a matter of minutes. Treating this as a casual beach walk is a critical error.
Your footwear is not a fashion choice; it is a critical piece of survival equipment. The correct protocol is to create a barrier between your feet and the scorching surface. Flip-flops and open-toed sandals are unacceptable as they offer zero protection. Going barefoot should only be considered for very short periods on the cooler, looser sand of a steep slipface for grip, and only during the low-heat windows of early morning or late afternoon.
For navigating the majority of the terrain, especially the compacted sand of the dune ridges which gets hottest, closed footwear is mandatory. Lightweight trail runners with breathable mesh and a good pair of socks provide the best combination of protection, support, and ventilation. The socks are not optional; they help manage moisture and prevent blisters, which can quickly become a debilitating injury in a desert environment.
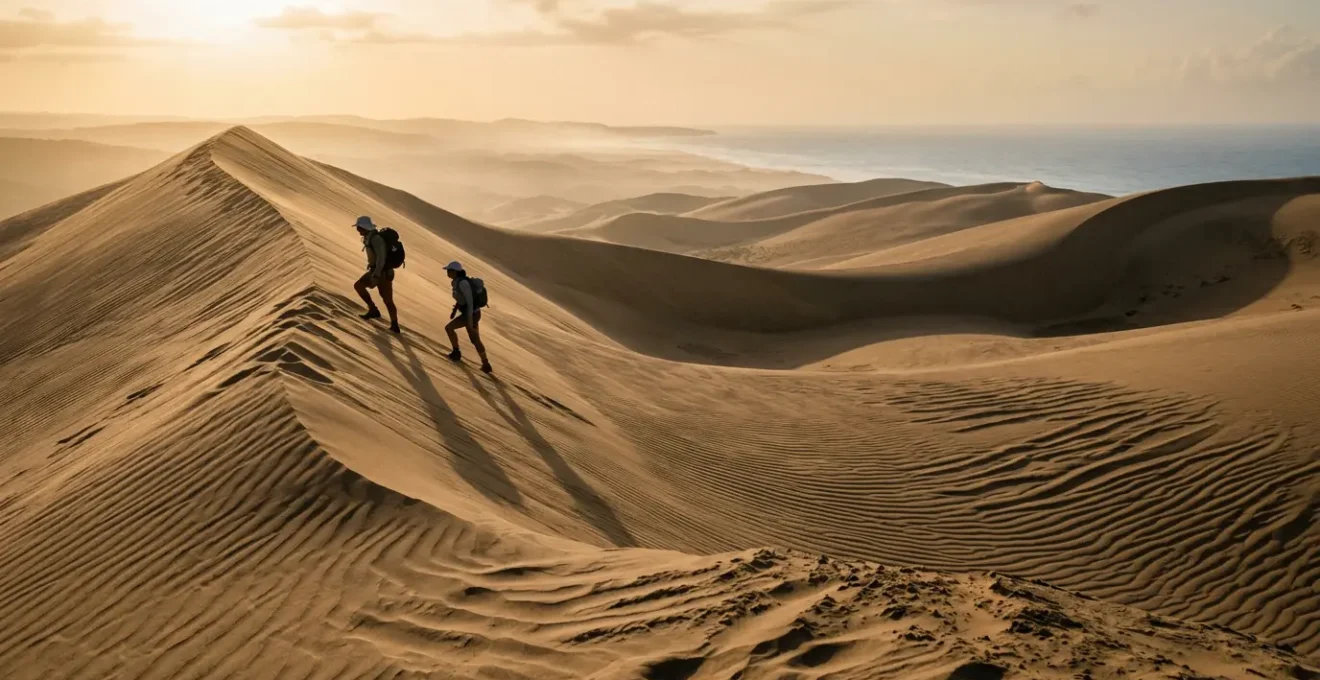
When Is the Best Time of Day to Slide Down the Dunes?
Tactical timing is the cornerstone of your mission plan. Your activity level must be inversely proportional to the sun’s intensity. Attempting strenuous activity like hiking or sliding down the dunes during midday is not just uncomfortable; it is a direct invitation to heatstroke. Your operational window is limited to the first few hours after sunrise and the last few hours before sunset. All other times should be dedicated to low-energy activity or strategic relocation.
Sliding or “sandboarding” down the dunes is most effective when the sand is dry and loose. This condition is typically met in the late afternoon, as the morning dew has completely evaporated and the day’s heat has baked the surface layer. Furthermore, the “golden hour” light of late afternoon provides superior visibility and photographic opportunities, with long shadows defining the dunes’ dramatic shapes.
To make an informed decision, you must consult the intelligence. The following tactical timing matrix breaks down the pros and cons of each operational window.
| Time of Day | Temperature | Best For | Pros | Cons |
|---|---|---|---|---|
| Sunrise (6-8 AM) | Cooler | Solitude & Wildlife | Empty park, animal tracks visible | Park may not be officially open |
| Morning (8-11 AM) | Moderate | General hiking | Good visibility, moderate temps | Crowds starting to arrive |
| Midday (11 AM-3 PM) | Extreme heat | Avoid completely | None | Dangerous heat, risk of burns |
| Late afternoon (4-6 PM) | Cooling | Sandboarding & sliding | Dry loose sand, golden hour light | Still warm, some crowds |
Field reports confirm this strategy. As one group of explorers noted, early arrivals before the official 8 AM opening found the coolest sand and the best photographic evidence of nocturnal wildlife, including tracks from iguanas and goats. This highlights the value of an early start for reconnaissance and a late-afternoon window for high-exertion activities.
How to Combine the Dunes and Salinas for a Perfect Day Trip?
A successful operation utilizes the entire 24-hour clock. The midday period, when the dunes are a thermal danger zone, should not be wasted. It is the perfect window to execute a combined operation by relocating to the nearby Las Salinas de Baní. This maneuver allows you to remain productive while the primary objective area is inhospitable. The key is a disciplined itinerary that maximizes favorable conditions at each location.
The optimal plan is as follows: execute your dunes hike at first light, concluding by mid-morning. Then, reposition to the town of Baní for resupply and rations (lunch). The period between 12 PM and 2 PM, when the sun is at its zenith, is the ideal time to visit the salt mines. The high sun is what illuminates the salt evaporation ponds, creating the vibrant pink hues that make for dramatic photographs. The industrial scenery of salt mounds and mining equipment offers a stark, compelling contrast to the natural forms of the dunes.
This combined landscape tour is effective, but be advised: field reports indicate that while photogenic from a distance, some areas of the salt mines can have strong odors and accumulated trash up close. Maintain situational awareness. After the salt mine visit, your final objective is to move to Punta Salinas beach for recovery (swimming) and to observe the sunset, concluding your day’s operations.
The Wind Mistake That Can Ruin Your Eyes and Camera
The sun and sand are obvious threats, but the wind is a more insidious one. On the dunes, the wind is a constant force that carries fine, abrasive particles of sand. A single gust can incapacitate you by filling your eyes with grit or permanently damage your mission-critical equipment, especially your camera. Underestimating this threat is a rookie mistake that can end your expedition prematurely.
Standard sunglasses are insufficient. You need wraparound-style glasses that seal the area around your eyes, preventing sand from entering from the sides, top, or bottom. In high-wind conditions, do not hesitate to upgrade to ski goggles for complete protection. Your vision is your most important sense in a survival situation; protect it at all costs.
Your camera is equally vulnerable. The fine sand particles can infiltrate lens mechanisms and camera bodies, causing irreparable damage. An equipment protection protocol is non-negotiable.
Your Essential Gear & Eye Protection Checklist: Defeating Wind-Blown Sand
- Wear wraparound sunglasses to block sand from all angles. For extreme wind, upgrade to ski goggles.
- Carry a small bottle of saline eye drops for flushing out any particles that breach your defenses post-hike.
- Protect your primary camera lens with a clear or UV filter. This filter is sacrificial; its purpose is to take the damage so your expensive lens doesn’t.
- Never, under any circumstances, change lenses while on the dunes. This exposes your camera’s sensor to direct contamination.
- When not actively shooting, seal your camera inside a plastic zip-top bag, secured with a rubber band around the lens barrel if necessary.
Treat your gear like you would a weapon. Keep it clean, keep it protected, and it will function when you need it most. Neglect it, and it will fail you.
How to Reach the “Secret” Beaches of the North Coast Without a Guide?
Let’s correct a common piece of misinformation. While the Dominican Republic’s North Coast has many famous beaches, the “secret beach” relevant to your Baní Dunes mission is located right here on the south coast. It is part of the Las Calderas Peninsula, where the dunes themselves are situated. The objective is not a cross-country trek but a short, tactical movement from the dunes to an isolated stretch of coastline. Accessing it requires basic reconnaissance techniques, not a guide.
Your primary tool for this reconnaissance is digital: use the satellite view on mapping applications to identify unmarked dirt roads or footpaths leading from the main dune area toward the Caribbean Sea. The dunes have two faces: one side opens into the calm Las Calderas Bay, while the other fronts the open sea. This latter side is your target. Cross-reference potential access points with geotagged photos on social media platforms to confirm their viability.
On the ground, local intelligence is key, but you must know who to ask. Avoid hotel staff who are trained to direct you to tourist-heavy areas. Instead, approach local fishermen or the staff at small village shops (colmados). Using a simple, respectful phrase like, “¿Conoce una playa tranquila por aquí?” (Do you know of a quiet beach around here?) can often yield the best results. Field reports confirm that a beautiful, secluded beach is accessible via a 10-minute walk through the dunes, offering a perfect reward after a strenuous hike.
Where to Find Artisan Workshops Instead of Tourist Souvenir Shops?
Your mission extends beyond the natural landscape. Part of a successful operation is engaging with the local culture authentically. The town of Baní and the surrounding Peravia province offer opportunities for cultural reconnaissance, far from the generic tourist souvenir shops. The key is to look for producers and artisans, not just resellers.
The region is the mango capital of the country. As the travel publication We Travel and Blog notes, “Baní is most well known for growing succulent mangos which the area produces.” This is your first clue. Instead of a generic souvenir, seek out local artisans making dulce de mango (mango sweets). This is an authentic, perishable product tied directly to the region’s identity. Similarly, exploring the nearby mountains can lead you to small-scale coffee producers.
To find true workshops, look for signs that say “Taller de Artesanía” (artisan workshop). When in doubt, ask for products that are “hecho a mano” (handmade). This signals your intent to find authentic goods. While the region is not as famous for it as other parts of the island, you may also find workshops for Larimar and Amber jewelry. Your objective is to acquire items that tell a story of the place, not mass-produced trinkets. This requires moving beyond the main tourist thoroughfares and into the heart of the local economy.
Key Takeaways
- The primary thermal threat is conductive heat from the sand, making closed-toe shoes non-negotiable.
- Tactical timing is your most critical tool: use the cool morning/evening for hiking and the hot midday for strategic relocation to the salt flats.
- Wind-blown sand is a serious threat to both your eyes and camera; implement strict protection protocols for both.
How to Photograph the White Sands Without Overexposing Your Shots?
Mission documentation—photography—in a high-glare environment like the Baní Dunes presents a technical challenge. Your camera’s light meter is easily fooled by the bright, reflective sand, leading it to underexpose the scene and render the beautiful white sands as a dull, muddy gray. To counteract this, you must take manual control of your exposure.
The standard operating procedure is to use exposure compensation. Dial in +1 to +2 stops of positive compensation to force your camera to let in more light, correctly exposing for the bright sand. To manage the harsh glare and deepen the blue of the sky, a Circular Polarizing Filter (CPL) is an essential piece of kit. It acts like polarized sunglasses for your lens, cutting through the reflective haze and increasing color saturation.
Composition is just as important as exposure. Use the natural S-curves of the dune ridges as leading lines to guide the viewer’s eye through the frame. To convey the immense scale of the landscape, include a person in some of your wide shots. The most dramatic shots, however, come from shooting during the optimal light windows. As photography experts advise, the first and last 90 minutes of daylight provide ideal golden hour conditions. Get low to the ground during these times to capture the incredible textures and patterns carved by the wind, with long shadows creating depth and drama.
You now have the intelligence. You have the protocols for thermal management, tactical timing, equipment protection, and mission documentation. Your objective is clear. The plan is sound. Now, execute that plan. Move out.