Successfully summiting Pico Duarte has less to do with your general fitness and more with mastering the specific environmental challenges most hikers underestimate.
- Your training must account for near-freezing temperatures that defy the mountain’s Caribbean location.
- A strict metabolic adaptation protocol is non-negotiable to combat altitude sickness above 2,500 meters.
- An honest assessment of your physical limits, not your ego, will determine your need for mule support.
Recommendation: Focus your training not just on cardio, but on gear discipline, acclimatization strategy, and ruthless self-honesty before you even set foot on the trail.
Alright, listen up. You think because you can run a 10k and hit the gym, you’re ready for Pico Duarte. You’ve heard it’s the highest peak in the Caribbean, and you picture a tough but tropical stroll. That’s the first mistake. I’ve been up and down that mountain more times than I can count, and I’ve seen that exact attitude break people who were twice as fit as you. They trained for the distance, but they didn’t train for the mountain. And this mountain has its own rules.
Most guides will tell you to get in shape, pack layers, and drink water. That’s not a plan; that’s a platitude. It won’t help you when the temperature plummets below freezing at 3,000 meters or when your head starts pounding from the lack of oxygen. The real key to conquering Pico Duarte isn’t found in your cardio stats. It’s in understanding and respecting three critical thresholds: the thermal shock, the physiological strain of altitude, and the brutal honesty required to know your own limits.
Forget what you think you know about hiking. This guide is built on decades of experience on that specific trail. We’re going to break down the real challenges, the non-negotiable preparations, and the strategic decisions you must make *before* you start. This isn’t just about reaching the summit; it’s about doing it safely, successfully, and with the respect this mountain demands. We’ll cover everything from your strategic starting point to your post-summit recovery plan, ensuring you’re prepared for the reality, not the brochure.
This comprehensive guide will walk you through the critical stages of your preparation. From choosing the right trail to building a full-week high-adrenaline itinerary, each section is designed to give you the practical, no-nonsense advice of a seasoned guide.
Summary: Your Complete Expedition Plan for Pico Duarte
- Jarabacoa or San Juan: Which Trailhead Offers the Best Experience?
- Why You Need Winter Gear for a Caribbean Mountain Hike?
- How to Prevent Altitude Sickness at 3,000 Meters?
- Mule or No Mule: Determining Your Limits on the Ascent
- When to Start the Final Ascent to Catch the Sunrise?
- How to Plan a Mountain Retreat in the Central Cordillera?
- How to Explore the Rainforest Canopy Without Getting Lost?
- How to Build a High-Adrenaline Itinerary for 7 Days in DR?
Jarabacoa or San Juan: Which Trailhead Offers the Best Experience?
Your first strategic decision is your starting point, and it’s not just about logistics; it’s about aligning the trail with your fitness and goals. The two main routes, from Jarabacoa (La Ciénaga) and San Juan de la Maguana, offer vastly different experiences. The Jarabacoa route is the most popular for a reason: it’s direct, well-supported, and gets you to the summit and back in 2-3 days. It’s for the hiker who is confident in their ability to handle a steep ascent and wants a more social, structured experience. You’ll find more guides and fellow trekkers here, especially during the peak dry season from December to March.
The San Juan trail, on the other hand, is for the purist. It’s a longer, 4-day trek that offers more solitude and a greater diversity of ecosystems. The ascent is more gradual, which is a significant advantage for acclimatizing to the altitude, potentially reducing your risk of Acute Mountain Sickness (AMS). However, the logistics are more challenging, with fewer operators and more remote access. Your choice here sets the tone for the entire expedition. Are you here for the swift, intense challenge or the slow, immersive journey? By law, a certified guide is mandatory in the national park, regardless of the route you choose.
To make the right call, you need to compare the objective demands of each trail against your personal profile. This comparison, drawing from data on the geography of Pico Duarte, lays out the facts.
| Aspect | Jarabacoa (La Ciénaga) | San Juan de la Maguana |
|---|---|---|
| Trail Distance | 23.1 km (14.4 mi) to summit | Longer 4-day trek route |
| Elevation Change | 1,977 meters (6,486 ft) | More gradual ascent profile |
| Duration | 2-3 days typical | 3-4 nights typical |
| Trail Traffic | Most popular route, more crowded | Less crowded, more solitude |
| Infrastructure | Well-established with La Compartición shelter 5km from summit | Less developed, more remote |
| Logistics | Easy access from Jarabacoa town, many tour operators | More challenging access, fewer operators |
| Biodiversity | Pine forests, cloud forests, alpine meadows | More diverse ecosystems over longer trek |
| Acclimatization | Faster ascent requires better fitness | More gradual, better for altitude adaptation |
Ultimately, the decision rests on an honest self-assessment. Don’t just pick the most popular option; pick the one that gives you the best chance of success and enjoyment.
Why You Need Winter Gear for a Caribbean Mountain Hike?
Here’s the single biggest mistake I see hikers make: they look at a map, see “Caribbean,” and pack for the beach. Make no mistake, while you’re in the tropics, you are ascending into an alpine environment. The summit of Pico Duarte is a world away from the coastal heat. On the mountain, temperatures at Pico Duarte’s summit can drop to 0-5°C (32-41°F), and that’s before accounting for wind chill, which can make it feel substantially colder. Showing up with just a light jacket is not just uncomfortable; it’s dangerous and a direct path to hypothermia.
Your survival and comfort depend on one critical concept: a three-layer thermoregulation system. This isn’t about one big, bulky jacket; it’s about adaptable layers that manage moisture, retain heat, and block the elements. As some unprepared hikers have found, waking up with a head cold or worse is a real risk when your gear fails in damp, cold conditions. The goal is to stay dry from both sweat and rain, because a wet hiker is a cold hiker, regardless of the ambient temperature. Proper gear isn’t a luxury here; it’s a non-negotiable part of your safety equipment.
Your Essential 3-Layer System for Pico Duarte
- Base Layer: Use merino wool or synthetic moisture-wicking fabric. Its job is to pull sweat away from your skin to keep you dry. Cotton is forbidden; it holds moisture and will chill you to the bone.
- Mid Layer: This is your insulation. A fleece or a lightweight down jacket traps your body heat. You’ll wear this at the cold La Compartición shelter and during the pre-dawn summit push.
- Shell Layer: A waterproof and breathable jacket is your shield. It protects you from rain and, just as importantly, the biting wind. It’s essential for preventing wind chill.
- Extremities Protection: You lose the most heat through your head, hands, and feet. Pack three pairs of quality thermal socks, insulated gloves, and a warm beanie or hat.
- Emergency Dry Set: Always keep one complete, dry outfit (base layer, socks, pants) sealed in a waterproof bag. This is your lifeline if your main gear gets soaked on Day 1.
Dressing for this mountain means preparing for four seasons in two days. Underestimate the cold, and you’ve already failed the first test.
How to Prevent Altitude Sickness at 3,000 Meters?
The second threshold you must master is physiological: your body’s reaction to altitude. Pico Duarte’s summit sits at 3,098 meters (10,164 feet), an elevation where Acute Mountain Sickness (AMS) is a real and serious threat for anyone coming from sea level, which is most visitors to the Dominican Republic. AMS is not a sign of weakness; it’s a response to lower oxygen levels. Symptoms can range from a mild headache and nausea to debilitating fatigue and poor judgment. Your job is to prevent it, not to tough it out.
The key is acclimatization. You need to give your body time to adapt. This starts 48 hours before your trek. You must aggressively hydrate and shift your diet towards carbohydrates, as your body uses them more efficiently for energy in low-oxygen environments. If possible, spending the night before your trek in Jarabacoa (500m) instead of at sea level in Santo Domingo or Punta Cana gives you a small but valuable head start. On the trail, the golden rule is “hike high, sleep low,” though on the standard 2-day trek, your ascent is rapid, making pre-trek preparation even more critical.
Distinguishing between normal trail fatigue and the onset of AMS is crucial. Are you just tired, or are you developing a persistent headache that doesn’t respond to painkillers? Are you losing your appetite? These are early warning signs you cannot ignore.
As the image illustrates, there’s a clear difference between earned exhaustion and the dangerous symptoms of altitude sickness. One is a badge of honor; the other is a signal to stop, hydrate, and notify your guide immediately. For some hikers, particularly those on a fast ascent, consulting a doctor about prophylactic medication like Acetazolamide is a wise move. According to a protocol for high-altitude travel, starting a low dose before the ascent can significantly aid acclimatization.
Mule or No Mule: Determining Your Limits on the Ascent
This is where your ego meets reality. The question isn’t whether you *can* carry your own 20-pound pack. The question is whether you *should*. The Pico Duarte trek is brutally steep. To put it in perspective, the total elevation gain for the complete Pico Duarte trek reaches 9,300 feet (2,835m) over 46 kilometers. That is a relentless, leg-burning ascent and descent. Adding the weight of your gear to that equation significantly increases the physical toll and the risk of exhaustion, which in turn exacerbates the effects of altitude.
Hiring a mule isn’t a sign of weakness; it’s a strategic decision. There are two options: a cargo mule to carry your gear, or a personal mule you can ride if you hit your limit. For most fit hikers, the hybrid strategy is the smartest choice: let a mule carry your heavy camping gear, food, and water, while you hike with a light daypack containing only your essentials (water, snacks, rain gear). This allows you to enjoy the physical challenge of the hike and the satisfaction of reaching the summit on your own two feet, without draining your energy reserves unnecessarily. As one hiker who just barely made it without assistance noted, it’s an amazing experience, but it pushes you to your absolute edge.
The local muleteers, or *arrieros*, are the lifeblood of this mountain. Hiring them not only makes your trek safer and more enjoyable but also directly supports the local mountain economy. The cost is minimal for the immense benefit it provides. Before you let pride make your decision, perform an honest self-assessment. Have you ever completed a multi-day trek with this much elevation gain? How does your body recover? Be brutally honest with yourself.
Case Study: The Hybrid Mule Strategy
A hiker, in good shape with intermediate experience, undertook the challenging two-day trek. They used a mule for their main pack but hiked the entire way themselves, including the 4 am summit push. They described the experience as incredibly challenging and admitted they “just made it,” concluding the mule support for their gear was a critical factor in their success. It preserved their energy for the trail itself, turning a potential failure into a triumphant—albeit exhausting—achievement.
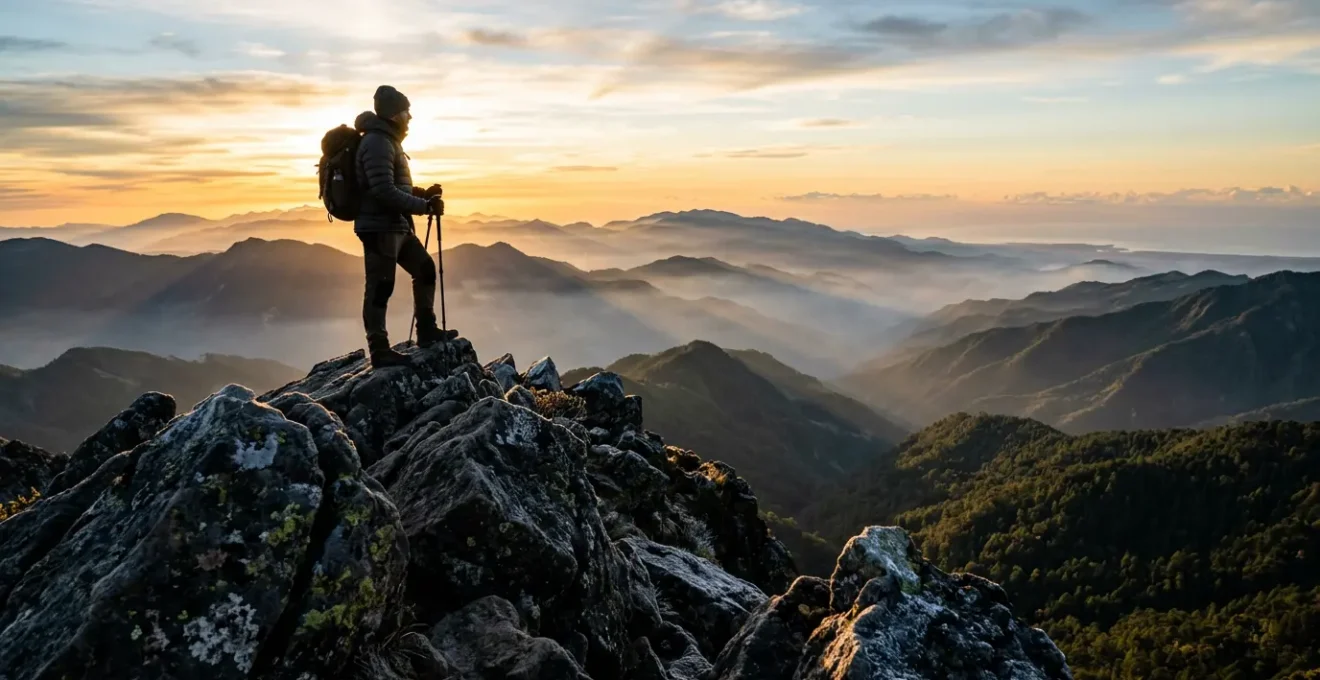
When to Start the Final Ascent to Catch the Sunrise?
You’ve made it to La Compartición, the final shelter at 2,450 meters. You’re cold, tired, and you’ve earned your rest. But the mission isn’t over. The reward for your hard work is witnessing the sunrise from the highest point in the Caribbean, and timing this final push is a military-style operation. This is what we call the “Alpine Start”: a pre-dawn departure in complete darkness, executed with speed and precision. It’s not a casual morning stroll; it’s a calculated assault on the summit.
The final ascent from La Compartición is a steep 5-6 kilometer climb that takes the average hiker between 2.5 and 3 hours. Your guide will determine the exact departure time, but it’s typically around 3:00 AM. This allows you to reach the summit with about 30 minutes to spare before sunrise (which varies from 6:00 AM in summer to 6:45 AM in winter). This buffer is crucial. It gives you time to find a good spot, set up your camera, and simply absorb the moment without rushing. It also accounts for any unexpected delays, like slower-than-expected pace in the dark or difficult terrain.
Success depends on pre-dawn efficiency. The night before, lay out all your summit gear: headlamp with fresh batteries, warm layers, gloves, hat, a snack, and water. When the 2:45 AM wake-up call comes, you don’t think, you just execute. Dress, eat your pre-prepared snack, do a final gear check, and be ready to move by 3:00 AM sharp. As a popular and successful approach confirms, this overnight stay at camp followed by an early push is what makes the experience both manageable and unforgettable. The darkness, the stars, and the shared sense of purpose as your small group of headlamps snakes up the final ridge is an experience in itself.
The return trip is much faster. After soaking in the sunrise, you’ll descend back to La Compartición for a well-deserved hot breakfast, usually arriving around 9:00 AM, before beginning the long trek back down to civilization.
How to Plan a Mountain Retreat in the Central Cordillera?
The expedition doesn’t end when you get back to the trailhead. How you manage your recovery is just as important as how you prepared for the ascent. The Central Cordillera, particularly the area around Jarabacoa and Constanza, is the perfect place for a post-trek mountain retreat. Don’t just rush back to the beach. Give your body and mind a few days to decompress, process the achievement, and enjoy the “Dominican Alps.”
Your first 24 hours post-trek should focus on gentle recovery. Think hot showers, a proper meal that isn’t a rehydrated pouch, and a comfortable bed. Many trekkers opt to stay in Jarabacoa for a night or two. Accommodations range from full-service hotels with spas to budget-friendly hostels. A gentle activity like a tour of a local coffee plantation or simply soaking your tired muscles in the cool waters of the Rio Jimenoa can do wonders for recovery. This is also your chance to connect with the local culture beyond the trail.
A well-planned retreat starts before the trek. Booking your accommodation in Jarabacoa for 2-3 days *before* the expedition allows for pre-trek acclimatization at a moderate altitude. This can be a game-changer. Use these days for light hikes to nearby waterfalls like Salto de Jimenoa or Salto de Baiguate, focus on hydration, and load up on carbohydrates. This strategy turns your entire trip into a cohesive mountain experience, rather than just a grueling two-day challenge.
To aid your planning, here’s a breakdown of accommodation options in the region, based on information from guides on trekking and lodging in the area.
| Accommodation Type | Best For | Price Range | Key Features |
|---|---|---|---|
| Rancho Baiguate | Organized trekkers | $255pp for 3-day trek | Full packages, professional guides, established reputation |
| Hotel Gran Jimenoa | Comfort seekers | $80-120/night | Riverside location, free breakfast, hot showers, recovery luxury |
| Jarabacoa Mountain Hostel | Budget travelers | $15-25/night | Backpacker vibe, trek connections, basic amenities |
| Private Eco-Lodge | Nature immersion | $100-200/night | Coffee plantation tours, yoga retreats, mountain views |
| Base Camp Glamping | Pre-trek staging | Free with tour | Included in packages, riverside sounds, early start advantage |
How to Explore the Rainforest Canopy Without Getting Lost?
During your ascent, particularly on the lower slopes, you will pass through dense sections of cloud forest and rainforest. While the main trail to Pico Duarte is generally well-marked, the feeling of being enveloped by the canopy can be disorienting, especially if fog rolls in. Getting lost here is a serious situation, as there is no cell service and the terrain is unforgiving. Navigation discipline is not just for mountaineers; it’s a critical skill for any part of this trek.
Your guide is your primary safety net, but you must also be a responsible member of the team. This means staying aware of your surroundings and having your own backup systems in place. Before you leave, pre-load the trail maps onto a GPS app on your phone, like Gaia GPS or AllTrails. Your phone’s GPS will work even without a cell signal, allowing you to confirm your position if you ever have doubts. Keep your phone in airplane mode to preserve the battery for this specific purpose.
On the trail, pay attention to the natural markers. The trail is marked with painted blazes on trees and rock cairns (piles of stones) at junctions. Memorize key landmarks: a specific river crossing, a unique rock formation, or the point where the pine forest transitions into the misty cloud forest. If dense fog reduces visibility, the rule is simple: stay within sight of the person in front of you. Never wander off the established path to take a photo or answer the call of nature without informing your guide. A simple whistle is also a crucial piece of safety gear; three sharp blasts is the universal signal for help.
Checklist for Cloud Forest Navigation Safety
- Digital Prep: Have you downloaded offline GPX trail maps to a reliable GPS app on your fully charged phone?
- Marker Awareness: Are you actively looking for trail markers like painted blazes and rock cairns, especially at junctions?
- Landmark Memory: Have you mentally noted the last major landmark you passed (e.g., river, shelter, ecosystem change)?
- Group Cohesion: In low visibility, are you maintaining visual contact with your group and staying on the marked trail?
- Emergency Protocol: Do you have an emergency whistle and know the “stop and blow” protocol if you get separated?
This isn’t about fear; it’s about professional-level preparedness. The rainforest is beautiful, but it demands your respect.
Key takeaways
- Pico Duarte’s challenge is not distance, but a combination of near-freezing cold, high altitude, and relentless elevation gain.
- A three-layer system (base, mid, shell) is non-negotiable for thermoregulation, and a dedicated dry set is your emergency lifeline.
- Proactive acclimatization, including hydration, a high-carb diet, and a gradual ascent, is the only effective way to prevent altitude sickness.
How to Build a High-Adrenaline Itinerary for 7 Days in DR?
You’ve conquered the highest peak in the Caribbean. Now what? The beauty of the Dominican Republic is that your adventure is just getting started. Pico Duarte can be the cornerstone of an incredible week-long, high-adrenaline “summit-to-sea” itinerary. The key is to structure your week intelligently, balancing high-exertion days with recovery and transfer time to avoid burnout. A successful multi-adventure trip, as some have demonstrated, balances the intense mountain challenge with coastal relaxation or other activities.
Here is a battle-tested framework for a 7-day adrenaline tour. Days 1-3 are dedicated to the Pico Duarte expedition via the classic La Ciénaga route. This is your main event. Day 4 is a dedicated recovery and transfer day. Spend the morning in Jarabacoa with a gentle activity, then in the afternoon, transfer to the north coast town of Cabarete, a world-renowned hub for water sports. The drive takes about 3 hours, placing you perfectly for the next phase of your adventure.
On Day 5, hit the water. Cabarete offers perfect conditions for learning to kitesurf or windsurf. On Day 6, take on the famous 27 Waterfalls of Damajagua, an incredible experience where you hike up a series of waterfalls and then jump, slide, and swim your way back down through a stunning tropical canyon. For your final day, Day 7, you have a choice: go paragliding over the coast for a bird’s-eye view, try canyoning in the rivers near Jarabacoa, or take an advanced lesson in your chosen water sport. This “Summit to Sea” approach gives you a complete taste of the Dominican Republic’s adventure potential, from its alpine peaks to its warm ocean waves.
Case Study: Successful Multi-Adventure Integration
One group successfully built a week-long adventure by tackling the Pico Duarte trek for the first three days. Afterward, instead of immediate high-adrenaline activity, they transferred to Punta Cana for three days of active recovery on the beach. They concluded their trip with a cultural day in Santo Domingo. This demonstrates a successful strategy of balancing the intense physical stress of the mountain with a period of lower-impact coastal relaxation before engaging in other activities.
You now have the blueprint. You understand the thresholds, the strategies, and the mindset required. The training starts now, not in the gym, but in your preparation. Plan meticulously, respect the mountain, and be honest with yourself. Your success on Pico Duarte will be determined long before you take your first step on the trail.