The difference between an amateur photo trip and a professional portfolio-building expedition is mindset: you must operate as a location manager, not a tourist.
- Success hinges on logistical sequencing, treating light, weather, and time as manageable assets.
- A “hub-and-spoke” basecamp model drastically outperforms linear travel for maximizing shooting opportunities.
Recommendation: Shift from merely finding locations to strategically managing them by forecasting weather in layers, calculating gear’s “shot-per-ounce” value, and sequencing your movements based on optimal light.
As a visual creator, the brief is intoxicating: capture the trinity of iconic landscapes—the rugged coast, the majestic mountain, and the stark desert—in a single, cohesive project. The amateur’s first thought is a grand road trip, a winding path from one scenic overlook to the next. They’ll research spots on Instagram, plan for the golden hour, and pack their bags. This approach often ends in frustration, with missed light, exhausting drive times, and a portfolio that feels more like a collection of vacation snapshots than a deliberate body of work.
The professional mindset is entirely different. For a location manager, this isn’t a vacation; it’s a production. The goal isn’t just to visit beautiful places, but to execute a logistical master plan that yields predictable, high-quality results. The real challenge isn’t finding beauty, but managing the variables that can derail a shoot. What if the key wasn’t about the car you rent, but about the strategic order you visit your locations? What if checking a single weather app is the most common mistake you can make? This guide is built on that professional premise. We will treat your itinerary as a production schedule, light as a quantifiable asset, and your gear as a calculated payload.
This article breaks down the professional workflow for building a multi-terrain photography itinerary. We will explore how to identify geographically dense “micro-continents,” manage legal and environmental constraints like drone flights, and make strategic choices about light, weather, and logistics that separate a successful shoot from a costly failure.
Summary: The Professional’s Playbook for Multi-Landscape Photography Logistics
- Why the DR Is Called a “Micro-Continent” by Geographers?
- How to Fly Your Drone Legally in National Parks?
- Where Is the Best Sunset Viewpoint: Mountain Peak or Ocean Horizon?
- The Weather App Mistake That Ruins Scenic Drives in the Mountains
- In Which Order Should You Travel to Minimize Drive Time Between Sceneries?
- How to Photograph the White Sands Without Overexposing Your Shots?
- How to Plan a Mountain Retreat in the Central Cordillera?
- How to Train and Prepare for the Pico Duarte Expedition?
Why the DR Is Called a “Micro-Continent” by Geographers?
The first step in professional location scouting is identifying a “micro-continent”—a region offering extreme landscape diversity within a manageable logistical footprint. The Dominican Republic is a prime example, but the concept is universal. You are looking for a place where coast, mountain, and desert biomes are clustered together, minimizing transit time and maximizing shooting days. The goal is to find an area that punches far above its weight in topographical variety. For instance, an analysis of Andalusia in Spain reveals five essential landscape types packed into just over 87,000 square kilometers. Similarly, California’s famous Highway 1 showcases a transition from a vast coastline to the towering Sierra Nevada and nearby deserts.
This geographical compression is your primary asset. It means you can potentially capture sunrise over coastal cliffs and sunset over alpine peaks on the same day. As a location manager, you don’t just look for pretty pictures on a map; you look for high-density variety. This involves analyzing topographical maps, satellite imagery, and climate data to assess not just the locations themselves, but the transitions between them. A region with a steep elevation gradient (over 3,000 meters) and clear transitional zones is a strong candidate for a portfolio-building expedition. Before committing to a location, run it through a professional assessment.
Your Action Plan: Diversity Scorecard Audit
- Proximity Radius: Map the driving distance between your core coast, mountain, and desert ecosystems. Your target is to have all three within a 200km radius of a central basecamp.
- Seasonal Access: Use climate data and historical road reports to verify that all target locations and connecting roads are accessible during your planned shooting window.
- Elevation Gradient: Calculate the total elevation change from your lowest point (sea level) to your highest peak. A variation of at least 3,000 meters is a strong indicator of photographic diversity.
- Transitional Zones: Use satellite imagery (like Google Earth’s 3D view) to evaluate the visual quality of the zones where ecosystems meet, such as where a forest gives way to desert scrub.
- Infrastructure Quality: Score the density and maintenance level of the road network. A robust network provides flexibility and crucial backup routes.
How to Fly Your Drone Legally in National Parks?
The short, brutal answer is: you don’t. Flying a drone within the boundaries of most U.S. National Parks is strictly prohibited and carries heavy fines. For a visual creator, especially a drone pilot, this is a critical piece of logistical information that dictates much of your itinerary. A location manager doesn’t see this as a roadblock but as a parameter to be managed. Your job is not to break the rules, but to know them so well that you can legally capture shots that *feel* like they’re from a national park, without ever entering its airspace.
This requires a deep dive into land management maps. The key is understanding that national parks are often surrounded by National Forests, Bureau of Land Management (BLM) lands, and State Parks. These adjacent territories frequently offer similar—if not identical—landscapes and have far more permissive drone regulations. The professional play is to scout locations just outside the park’s official boundary. This might mean finding an overlook on a National Forest road that looks back into the park, or a stretch of BLM land that shares the same geological formations. Always verify the specific rules for the exact land you plan to fly on, as regulations can change. An indispensable part of your pre-production toolkit should be a clear understanding of these boundaries.
To operate effectively, you need a clear framework for what is and isn’t possible. The following table, based on common regulations found on land management resources like those provided for California, breaks down the typical opportunities and restrictions you’ll face.
| Area Type | Drone Status | Typical Buffer Distance | Alternative Opportunities |
|---|---|---|---|
| National Parks | Prohibited | N/A | Designated overlooks |
| National Forests | Generally Permitted | Often adjacent | Similar landscapes |
| BLM Lands | Usually Permitted | 0-10 miles | Comparable terrain |
| State Parks | Varies by state | Variable | Check regulations |
Where Is the Best Sunset Viewpoint: Mountain Peak or Ocean Horizon?
This isn’t a question of preference; it’s a question of light dynamics. A location manager knows that each location offers a different type of “light asset” at sunset. The ocean provides a clean, unobstructed horizon, leading to a predictable, fast-fading sunset with a classic “fireball” sun. It’s reliable but can be one-dimensional. The mountains, however, offer a far more complex and dynamic light show that often continues long after the sun has disappeared from view. This is where the pros find their most dramatic shots.
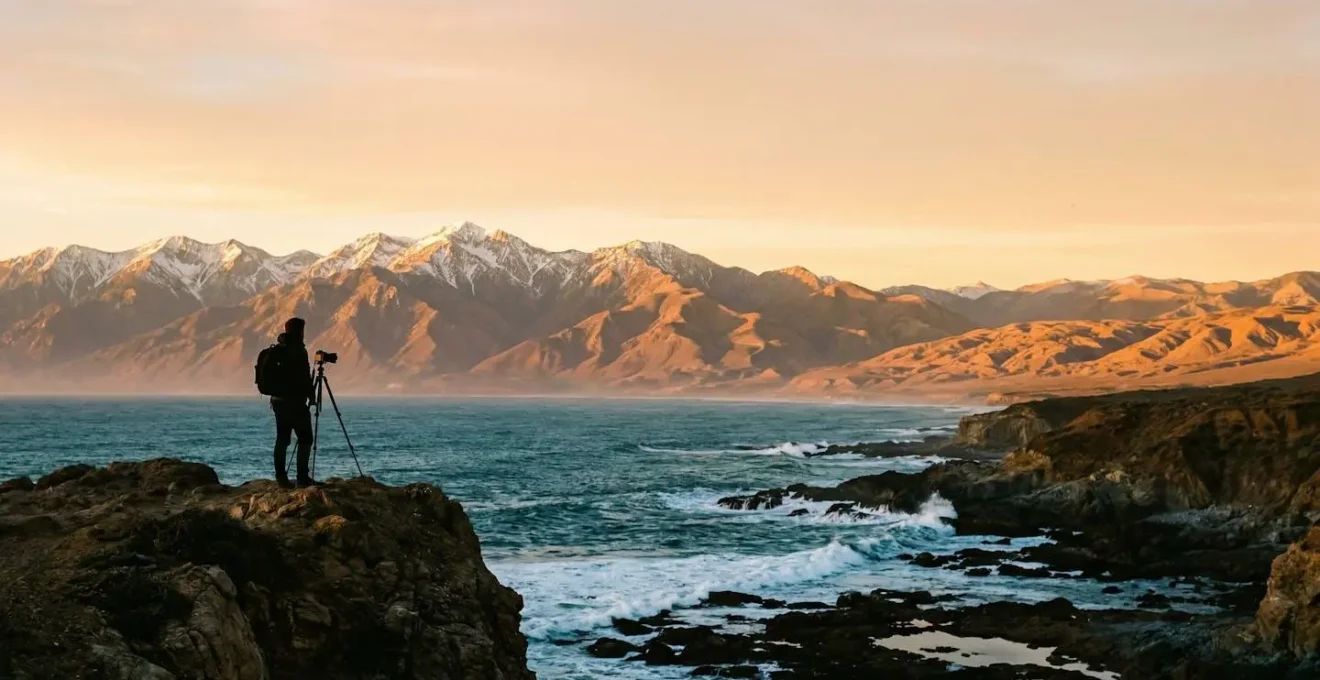
Mountain sunsets are about layers and extended light. You get the initial golden hour, but then the real magic begins. As the sun dips below the horizon, it can create alpenglow, a phenomenon where the highest peaks are illuminated in a vibrant pink or reddish glow while the valleys below are already in deep blue shadow. This creates an incredible color contrast and a sense of depth that is impossible to capture over the ocean. Furthermore, the ridges and valleys create shadows and highlights that evolve by the minute, offering a continuous stream of compositions. Professional landscape photographers know that the edges of the day provide a 180° lighting variation, and mountains allow you to exploit every degree of it by simply turning your camera. Instead of one sunset, you get a sequence of them as the light catches different peaks.
This image perfectly illustrates the concept of alpenglow and atmospheric perspective. Notice how the light only kisses the highest peaks, creating a dramatic separation from the shadowed foreground. This is a light effect you simply cannot get at sea level. Tools like The Photographer’s Ephemeris are invaluable for predicting exactly which peaks will be hit by this “second sunset,” allowing you to plan your shot with military precision rather than just hoping for good luck.
The Weather App Mistake That Ruins Scenic Drives in the Mountains
The single biggest mistake a creator can make when planning a mountain shoot is relying on a standard, city-based weather app. That forecast for the nearest town is, at best, a vague suggestion and, at worst, dangerously misleading. Mountain weather operates on a completely different system of microclimates. The temperature can drop 20 degrees and the weather can shift from sun to blizzard in the time it takes to drive a few thousand feet up in elevation. A location manager knows that trusting a single source is an amateur move. You need a multi-layered approach to forecasting—what we call “predictive scouting.”
Predictive scouting means cross-referencing multiple, specialized data sources to build a comprehensive picture of the atmosphere. It’s about looking at wind patterns at different altitudes, checking real-time visual data, and understanding the physical signs of weather changes in the sky. For example, the beautiful, lens-shaped lenticular clouds that photographers love are actually a sign of extremely high winds at altitude—great for a photo, terrible for drone stability. This proactive approach allows you to anticipate conditions, not just react to them. For example, a case study on the rain shadow effect in the Anza-Borrego desert shows how a photographer used approaching clouds to frame the scene, turning potentially “bad” weather into a compositional asset.
Your strategy shouldn’t be to just “check the weather.” It should be to build a complete intelligence report using the following triangle strategy:
- Layer 1: Macro Patterns: Use professional-grade services like Windy.com or Meteoblue. These platforms allow you to see wind, cloud cover, and pressure models at multiple altitudes, which is crucial for understanding what’s happening above the peaks, not just in the valleys.
- Layer 2: Ground Truth: Check official park webcams and local weather stations every hour or two leading up to your departure. This gives you real-time, on-the-ground conditions and helps verify if the models are accurate.
- Layer 3: Visual Interpretation: Learn to read the clouds. Recognize the difference between harmless cap clouds indicating stable air and towering cumulonimbus clouds that signal impending thunderstorms. This is an analog skill that no app can replace.
In Which Order Should You Travel to Minimize Drive Time Between Sceneries?
The question is framed incorrectly. The goal of a location manager isn’t just to minimize drive time; it’s to maximize “prime light” shooting time. A linear A-to-B-to-C route, while seemingly efficient on a map, is often a logistical nightmare for photography. You’ll inevitably find yourself at an east-facing location in the afternoon or a west-facing one at sunrise, wasting the best light. The professional solution is the “Hub and Spoke” model, where you establish a central basecamp and execute targeted day trips.
This model, often used in complex productions and detailed in professional photography forums, treats your accommodation as a production office. From this central hub, you can launch specific missions to different locations—coast, mountain, or desert—based on the optimal light and weather for that particular day. It transforms your plan from a rigid, linear path into a flexible, modular system. If the mountains are socked in with clouds, you pivot to your coastal location without derailing the entire itinerary. This approach requires more upfront planning but offers exponentially more flexibility and a higher probability of success. It’s a strategy that, as photographers shooting in Iceland found, allows for clear organization and the ability to adapt on the fly by simply choosing a different “spoke” for the day.
The sequence of your shoots should be dictated by a Light-Based Sequencing Strategy. First, map all your potential locations. Then, using an app like PhotoPills or The Photographer’s Ephemeris, determine the optimal time of day for each (e.g., sunrise, sunset, blue hour). Your itinerary is then built by combining daily weather forecasts with this lighting data. For instance: “Tuesday has clear skies forecast for the morning and clouds moving in from the west in the afternoon. Therefore, we will execute the east-facing mountain sunrise shoot first, then pivot to the coastal location to capture dramatic, cloudy skies at sunset.” This is how you move from simply traveling to strategically producing.
How to Photograph the White Sands Without Overexposing Your Shots?
Photographing highly reflective environments like white sand deserts, snowfields, or salt flats is a technical challenge that consistently fools even modern camera meters. Your camera’s light meter is programmed to see the world as “middle gray.” When it sees a scene dominated by brilliant white, it assumes the scene is overexposed and tries to compensate by underexposing the shot, resulting in muddy, gray-looking sand. A location manager knows that you cannot trust the camera’s automatic settings in these environments; you must take manual control and give the camera better information.
The most reliable technique for this is called “Exposing to the Right” (ETTR). This involves intentionally overexposing the image as much as possible without “clipping” or blowing out the highlights. This captures the maximum amount of light data in the RAW file, leading to a cleaner, more detailed final image once adjusted in post-production. You use your camera’s histogram and highlight warning (“blinkies”) as your true guide, not the image on the LCD screen. You push the exposure up until the brightest parts of the sand are just about to flash, then back off slightly. This ensures your whites are truly white, not gray.
For critical shots where you cannot risk failure, exposure bracketing is your best insurance policy. This involves taking a sequence of three or five shots at different exposure levels (e.g., -1, 0, +1 EV). This manual process guarantees you’ll have a usable frame. Your checklist for nailing exposure in these challenging conditions should be precise and repeatable:
- Switch to Manual Mode: Take full control away from the camera’s auto functions.
- Enable Histogram & Highlight Warning: These are your primary exposure tools. Do not shoot without them visible.
- Shoot in RAW: This is non-negotiable. It preserves the maximum amount of data needed to recover highlights and shadows.
- Use Spot Metering: Meter on the brightest part of the sand that isn’t a direct specular reflection of the sun. This gives your meter a more accurate starting point.
- Apply the ETTR Technique: Gradually increase your exposure until the histogram data is pushed to the far right edge without going over.
How to Plan a Mountain Retreat in the Central Cordillera?
Planning a mountain retreat, whether in the Dominican Republic’s Central Cordillera or any other range, requires a shift in thinking for a photographer. You are not booking a vacation rental; you are establishing a forward operating base (FOB) or a “basecamp.” The criteria for selecting this base are purely logistical and production-oriented. Proximity to trailheads, power reliability, and orientation for light are far more important than luxury amenities. Your basecamp is a tool, and its effectiveness directly impacts the productivity of your shoot.
The first step is a map-based analysis. Your ideal basecamp should be within a 30-minute drive of at least five different trailheads or shooting locations. This variety is your contingency plan. If one valley is fogged in, another might be perfectly clear. Next is a factor many overlook: power reliability. You will be running multiple chargers for cameras, drones, laptops, and power banks. Verify that your chosen location has 24/7 electricity, not a generator that shuts off at 10 PM. If in a remote area, confirm they have a robust solar setup with battery backup. Losing a night of charging can cripple the next day’s shoot.
Finally, consider the orientation and resources of the basecamp itself. A west-facing balcony might provide a fantastic sunset shot on a day when you’re too exhausted for another hike. An indoor space with large windows can become an impromptu studio for portraits or gear shots during a storm. Before booking, ensure you can download offline maps of the entire region (using apps like Gaia GPS or AllTrails) to your devices, as cell service is never guaranteed. Your basecamp is your sanctuary and your launchpad; its selection should be as strategic as any other part of the expedition.
Key Takeaways
- Adopt a “Hub-and-Spoke” model: Use a central basecamp to launch flexible, daily trips based on real-time weather and light conditions.
- Master predictive scouting: Combine macro weather models, real-time webcams, and visual cloud reading to anticipate conditions, not just react to them.
- Calculate your “shot-per-ounce” value: Every piece of gear must justify its weight. Lighter packs lead to more energy, more mobility, and ultimately, more shooting time at high altitudes.
How to Train and Prepare for the Pico Duarte Expedition?
An expedition to a major peak like Pico Duarte is as much a physical challenge as it is a photographic one. From a location manager’s perspective, your physical capacity is a core production resource. If you’re exhausted, you can’t think creatively, you can’t react quickly to changing light, and you risk making mistakes. Therefore, physical conditioning and gear preparation are not optional; they are fundamental pre-production tasks. Your goal is to make the physical act of hiking so second-nature that all your mental energy can be focused on composition and execution.
Your training should simulate the specific stresses of a photo expedition. It’s not enough to just hike; you need to hike with your gear. This “gear shakedown” process identifies critical issues before they become problems on the mountain. Does your pack’s waist belt interfere with access to your lens pouch? Does your camera strap create a painful pressure point after three hours? These are details you must solve at home. The weight of your pack is a direct enemy of your creative endurance. Compelling studies of mountain photographers show that for every 5 lbs of gear carried, shooting time can be reduced by as much as 20% at altitudes above 10,000ft due to fatigue. This is a quantifiable metric. Your job is to ruthlessly calculate the “shot-per-ounce” value of every item you pack. If an item doesn’t significantly increase your ability to get a critical shot, it’s dead weight.
Your gear shakedown should be a progressive, multi-week process:
- Weeks 1-2: Baseline Fitness. Start with practice hikes carrying an empty camera bag to build your cardio and leg strength without the strain of a full load.
- Weeks 3-4: Full Load Simulation. Add your complete gear load. Focus on identifying pressure points from your pack and addressing balance issues on uneven terrain.
- Weeks 5-6: Accessibility Drills. Practice accessing your gear while on the move. Can you pull your primary camera and change a lens without having to take off your pack? Seconds count when the light is perfect.
- Weeks 7-8: High-Intensity Simulation. Combine high-intensity cardio (like stair climbing) with immediate practice shooting to simulate how your body and hands will feel at the summit when you’re out of breath.
By shifting your perspective from that of a traveler to that of a production manager, you transform the entire endeavor. You are no longer at the mercy of luck and weather; you are a strategic operator, managing assets and executing a well-defined plan. Start applying this logistical mindset to your next project, and you will not only capture better images but also build a more resilient and professional creative process.